A Guide to the Twitch Dashboard
If you are a Twitch streamer, this will be one of the screen you’ll look at the most during your streams and after them too.
It contains everything you need to create before you go live, everything you need to monitor when you are live, and everything you should be looking at when you finish your stream.
What can you find inside the Twitch dashboard?
- Your stream manager – edit your stream info live, check recent activity, see a preview of your stream and use quick actions while you are live to make running your stream easier
- Insights – Your overall channel analytics, stream statistic summary and achievements. (Here’s a complete guide to Twitch stats).
- Community – Here is the easiest place to manage your editors, Mods and VIP viewers
- Content – Inside here you can find Twitch’s video producer, the ability to make collections (basically playlists) and your clip manager
- Preferences – Your settings and options
- Drops – The ability to run and monitor Drops on your channel. I imagine this is going to become more and more important for Twitch
- Streaming Tools – Links to the recommended tools you can use to stream
- Extensions – Extra features and functionality from third-party developers and Twitch that you can overlay on top of your stream or add to your profile. Here’s a link to the best 12 Twitch extensions
- Creator Camp – Guides and short videos from other streamers, they are good, but mine are maybe better?
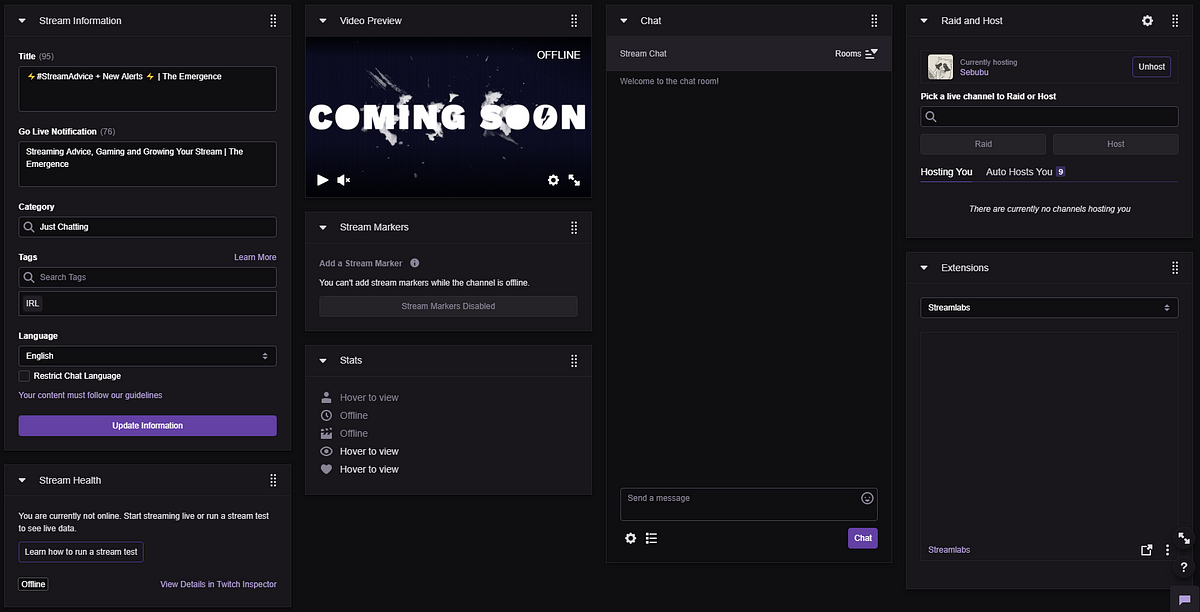

Stream Information
If you are a streamer on Twitch, this is the most important part of the Dashboard. It contains all the information you need to get right before starting, as this is all the information a viewer will see when you are live. It’s also all the ways that a viewer will find your stream.
Title — What is the title of your stream going to be? We’ve written an awesome guide to creating a stream title.
Go Live Notification — If a user has set their notifications on for when you go live, they’ll receive a notification on the phone (or top-right of their desktop browser) which you can completely customise!
Category — Are you streaming a particular game or doing an activity like cooking, art or a talk show? This is where you add the information so Twitch knows where to place you in the platform, and viewers can find your channel when browsing around.
Tags — For viewers, tags act as ‘filters’ for them to find the perfect stream for them. For us streamers, tags enable us to explain what our content is about in more detail than ever alongside the category we stream in and language we use. You can use tags such as “AMA”, “woodwork”, “politics”, “LGBT” and even the hero you are playing in games like League of Legends and Overwatch
PS; are you looking to learn more about Twitch Tags? check out the guide below.
Language — To keep it simple, use the language you speak. You don’t want Spanish viewers coming in chatting when you can talk or answer them. That’s a bad viewing experience and not a particularly fun stream experience for you. However, I would advise you to never tick the ‘restrict chat language’ button as your stream will not appear unless a viewer speaks the language you have set on the Twitch dashboard — this is a flaw that lets down bilingual and streamers!
Once you’ve updated this, press the big purple ‘Update Information’ button and it shall save all your changes.
PS it is worth saying that these changes are made when you are offline, so you can update your Title to something like “taking a week off, back 27th Jan” for any that visit your channel while you are offline.

Stream Health
When streaming, this will show a continuously updated graph which depicts the strength & quality of your stream and whether it has dropped a significant amount of frames for your viewers.
This is worth keeping an eye on as you don’t want the quality (and connection) of your stream to suffer and give a bad experience for your viewers.
You can also use the external tool, Twitch Inspector, to analyse your stream while live.
Video Preview
There have been a few times I have switched games (or gone for a break) and come back to the stream, but forgot to switch my OBS scene… so I’m talking away playing a game, but the viewers only see a black screen 🤦.
The video preview window is pretty self-explanatory, the preview will display what viewers see while you are streaming. It’s a good idea to check this at the beginning and at various times throughout your stream to make sure everything looks good and is working as expected!
The video preview section is super useful when you are testing your stream before you start your twitch channel.
Stream Markers
A new feature to Twitch that allows you to mark specific moments in your VOD after you finish streaming. Utilising highlights is one way to help grow your channel by showing off specific funny, unsuspecting or incredible plays during your live stream. You can title these and add a description to help any editors (or yourself) edit the footage after in the Twitch highlighter tool.
Your highlighter tool can be found within the ‘Video Producer’ part of your Dashboard. Highlights will live on your stream forever, as opposed to VODs which disappear after 7 days (or 30 days for partners)

To add stream markers, your channel must have Past Broadcast storage enabled (found within your settings).
Stats
Hey, statistics! Some people hate them, some people love them… but your stats are going to show you your growth more than anything else.
Your stats show the following:
- Viewers
- Current stream time live
- Number of clips made
- Total views
- Followers
Each of these is clickable, so if you are looking to hide viewer count on Twitch, click it and it’ll hide it.
Want to learn more about Twitch Stats? Here’s a more detailed guide:
Chat
If anyone is talking in your chat, it’ll appear here. By clicking on the user’s name you can see how many messages they have sent in your chat, how many timeouts and bans they have occurred, and when their account was created, followed you and subscribed to you.
What options do you have?
- Timeout
- Block
- Add ‘Mod’ comments — so context can be added to each user in case you have multiple mods helping run your channel
Raid and Host
Raids and hosts are the easiest ways to share your audience with another creator. Both of these methods are amazing ways to network and build a wider community.
What is a raid? — Raiding on Twitch is to move your entire viewing audience to another channel at an exact moment to surprise and share. It’s the best way to end your stream by far.
What is hosting on Twitch? — You are able to broadcast another channel’s live stream on your own channel. This can be done at the end of your stream, or it can be set to auto-host people when you are offline.
Extensions
Any extensions you have running as overlays on your Twitch channel will appear here. Extensions are interactive 3rd party interactive overlays and panels, allowing streamers to open up a whole new world of fun, interaction information for their viewers and higher engagement from the streamer’s communities.
You can see the best Twitch Extensions here:
Alternatives to the Twitch Dashboard
While there are no real alternatives that enable you to do everything you can do on the Twitch Dashboard in one place, there are some like Streamlabs or StreamElements that give you some functionality.
Plenty of other tools you can be used to monitor both yours (and your friends) stream information. For example, the best Twitch Bots all have their own analytics functionalities and some (like Streamlabs) will show viewer data from previous streams.
Other awesome Twitch tools include the likes of:
The Emergence – Streaming Guides For All
The Emergence is a stream education, guides & tutorial website who also happens to stream. You can find out more about us below:
- Website — theemergence.co.uk
- Twitter — twitter.com/emergencegg
- Twitch — twitch.tv/theemergence
- Discord — discordapp.com/invite/VxFA7Xc

❤


